 It's not a new medium, though it is maybe an unfamiliar one. I first introduced this air dry clay on The Carol Duvall show a couple of years ago. It is definately one of the shows that I would consider one of my 'hits'. It generated alot of viewer email.
Today I was again working with Craft Porcelain clay doing the designer thing in trying to 'stretch' its limits and see what you can mix in...and what you can't. I have several 'test' pieces lying on the workbench drying.
Some tend to confuse it with "porcelain" clay. While it has nothing to do with real porcelain clay, it does have the look of it when finished. It can be painted with watercolor pencils or crayons if you wish to preserve the translucency of the clay. It can also be painted with acrylics if a more opaque look is desired
There is a slight learning curve in working with it. It's NOT polymer clay. It doesn't feel like it and it doesn't look like it. But for some reason, when I first tried working with this clay, I wanted it to BE it.
 Keep this in mind, because if you are expecting this to work like polymer you will be in for a sad suprize.
Only have a small portion out at a time. I usually keep this lump under a damp paper towel or spritz some water in a zip-lock bag and let it sit in there. If it dries out a little, add a drop...and only a drop of water. If you add too much it will be sticky. The remedy to this is let it dry a little.
Coat your hands with baby oil and this will help prevent sticking to your fingers. It also helps to keep the surface smooth.
 Store tightly in a zip-lock bag with all the air removed.
Many viewers want to know "how do I attach the pieces'? There are a couple of different ways. As you are working with it you can add a drop of water to the piece you are attaching and the place you are attaching it too. This will help that spot to be extra gooey and provide a good bond. To adhere pieces that are already dried, I use a good white tacky glue.
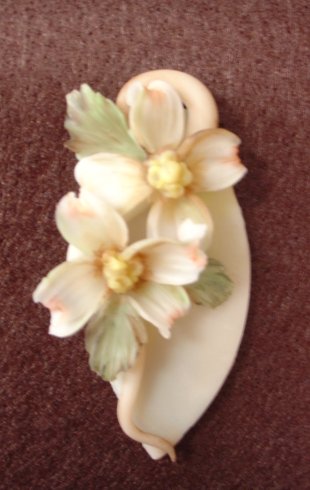
These particular photos are the pieces a featured on the show. Because the clay is so extremely durable after it dries - even in areas that are very thin, it is an excellent choice to replicate florals.
As with all air-dry clays it does shrink. I have found that the shrinkage is about 10-12%.
I noticed this particularly when working with the florals. I went back the next day and there were gaps. To fill in the gaps, I simply scraped some clay and filled in the gaps simulating extra "filler" foliage.
Today I experimented making and mixing different colors. While I was somewhat successful...and i'll have those results on another blog, I will tell you not to mix acrylic paint into it. While it will - sort of work, the results are not that great and the mess really isn't worth it. I was able to replicate some promising stone effects.
All in all, this is an excellent clay and I am quite confident that once you get the hang of it you will really enjoy working with it. i've had many emails from several viewers telling me how much they enjoyed working with it. Many of whom were beginners and had only experienced working with bread dough. It is a great choice for those who don't want all the worry of working with polymer, when you don't have an oven handy or when you want something to "craft" in the car while you are traveling.
The clay is available in an 8oz tub for $8.99 plus $5.00 shipping. Currently, I only stock the white - since it is my favorite and the most versatile. To purchase simply click on the Buy now button below.
Your total purchase price is $14.99. Free Project sheets included.
Be sure to check out all my Projects available on my website at http://www.lindapetersondesigns.com/
I'm off to Iowa for the rest of the week. I'll still be experimenting with the clay and working on a few papercraft projects. So until next time...Keep on Claying!
1 comment:
If you want to add color, try using watercolor paint (the type that comes in a tube) or cake frosting dye, I've used both with success. If you use the cake dye be sure to wear rubber gloves when mixing.
Post a Comment